Dip a marshmallow, a pretzel, or even a graham cracker into a bath of melted chocolate, and suddenly, the mundane becomes magical. But here’s the catch: If you’re using fine, unadulterated chocolate—as opposed to artificially flavored coatings fortified with vegetable oils—you must temper it first. Chocolatier Kristen Hard describes this as a “journey in crystallization,” a process of melting and cooling that produces chocolate with a glossy sheen and crisp snap. It melts smoothly and sensuously on the tongue, not between your fingers. Skip this step, and the hardened chocolate will have a dull or streaked finish.
For home cooks, Hard recommends the “seeding” method, in which you add a chunk of hard, tempered chocolate to a pot to bring the temperature down and stir until it’s emulsified. A few safeguards: Work in a cool kitchen, and don’t temper on a rainy or humid day. Keep all utensils and surfaces dry; chocolate hates moisture, and one drop of water can ruin a whole batch. Also, start with at least a pound of chocolate containing 60 to 70 percent cocoa solids. The chocolate should already be tempered—hard and shiny, not crumbly and chalky.
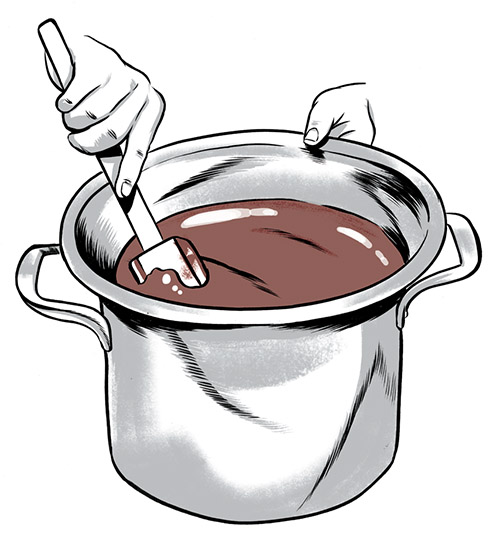 1. Finely chop 2 pounds of dark chocolate. Reserve a third for seeding. Place the rest in a double boiler. Stir frequently with a dry silicone spatula until chocolate reaches 115 to 119 degrees.
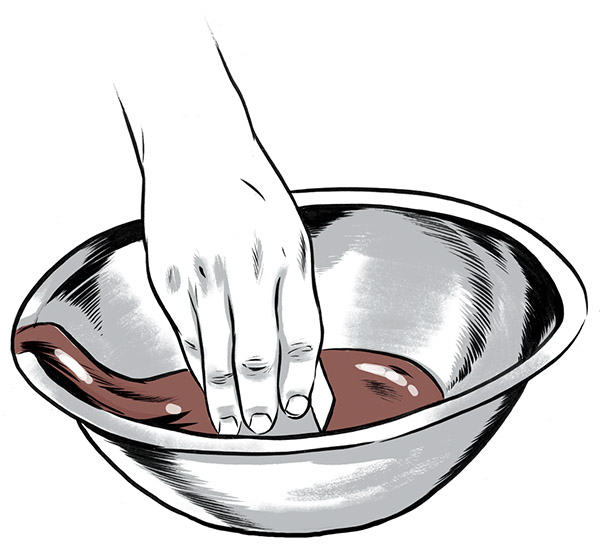
 2. Transfer bowl to folded towel to absorb moisture and hold in place. Stir in remaining chocolate a little at a time until incorporated, allowing it to cool to 82 to 85 degrees.
 3. Use the double boiler to bring the temperature up to 88 to 89 degrees. Remove the bowl, and spread a bit of the chocolate onto wax paper. If it sets up quickly with a shiny finish, you are ready to dip. If it’s dull, repeat.
 4. Dip whatever you choose into the chocolate. Gently shake off excess and set on a wax-paper-lined pan to dry. Keep checking the chocolate’s temperature and reheating as needed.
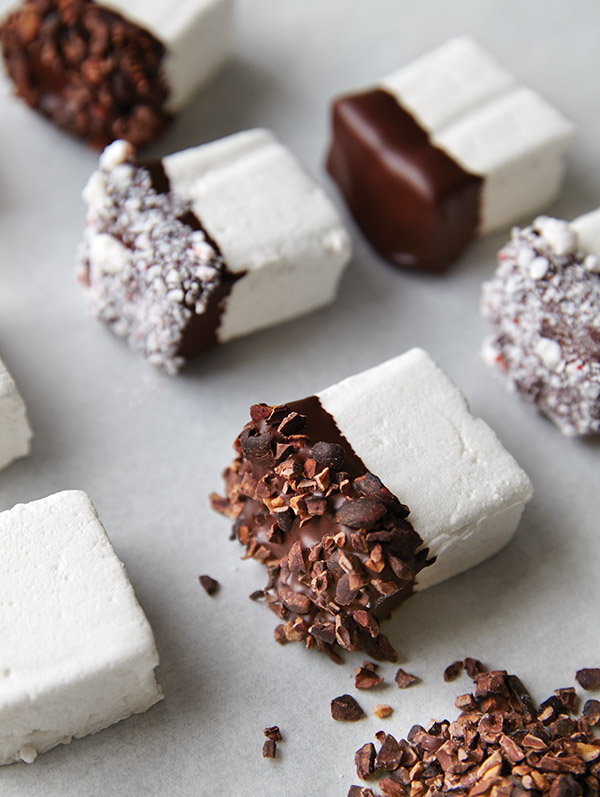
 5. Feel free to roll the dipped goods in finely chopped nuts, peppermint, graham crackers, or toasted coconut. Besides adding another layer of flavor, it will camouflage flaws.
Hold your temper
The key to successful tempering is maintaining a steady temperature. A reliable thermometer—preferably digital—is critical. If your temperature starts to drop, either set the bowl back on the double boiler for just a few seconds, or blast the chocolate with a blow-dryer as needed.
Bonus recipe: Cacao’s Homemade Marshmallows
Making marshmallows from scratch takes surprisingly little effort, and the rewards far exceed any store-bought counterpart. These marshmallows can be cut into any size, but know that smaller ones are fantastic for floating in a cup of hot chocolate. They also make for a stunning topping atop a sweet potato casserole.
Ingredients
2 to 3 tablespoons flavorless vegetable oil
1 cup cold water, divided
1 ounce (4 1/4-ounce packets) powdered gelatin
1 1/4 cups granulated sugar
1 cup glucose or light corn syrup
1/4 teaspoon sea salt
2 teaspoons bourbon vanilla extract (other vanilla or flavoring may be substituted)
1/2 cup confectioners’ sugar
Instructions
1. Lightly oil a 9-by-13-inch pan. Line the pan with parchment paper, leaving a 2-inch overhang over the long sides. Brush the parchment paper with oil.
2. Pour 1/2 cup cold water into the bowl of a standing electric mixer attached with a wire whisk. Slowly pour the gelatin over the water and immediately whisk it until thoroughly incorporated and there are no lumps.
3. In a medium saucepan, combine the sugar, the other 1/2 cup of water, glucose or corn syrup, and sea salt. Stir to fully incorporate. Turn the heat to high and leave the mixture to boil until it reaches 240 degrees. Remove the mixture from the heat and carefully pour it over the gelatin, with the mixer set to lowest speed.
4. Turn the mixer to medium speed. Set a timer to 13 minutes, then increase to full speed. Whip for 12 minutes, add vanilla, then finish whipping for 1 more minute. Pour mixture into parchment-lined pan, spreading evenly with a lightly oiled spatula. Let set overnight, uncovered, to firm up and dry out.
5. The next day, sift about 2 tablespoons of the powdered sugar over the surface. With an oiled pizza cutter, cut the marshmallows into desired sizes. Dust on all sides with more confectioners’ sugar to prevent sticking.
6. Store in an airtight container for up to 2 weeks. Marshmallows can also be wrapped airtight and frozen. Thaw in the refrigerator overnight before bringing to room temperature.
7. Once marshmallows are cut, you can dip them in chocolate (one end only) and roll them in sprinkles, crushed cocoa nibs, graham cracker crumbs, crushed peppermint, toasted coconut, and chopped nuts.
Makes about 4 dozen large (2-by-2-inch) marshmallows
 About Kristen Hard
Hard was working as a chef on a private yacht when she saw women crushing cacao beans over a fire on a stop in Martinique. Enthralled, the native Atlantan nixed her plans for law school and instead taught herself how to make chocolate from direct-trade beans grown in Central and South America. Today, she’s the owner and founder of Cacao Atlanta Chocolate Co.
Illustrations by Joel Kimmel
This article originally appeared in our February 2015 issue.